
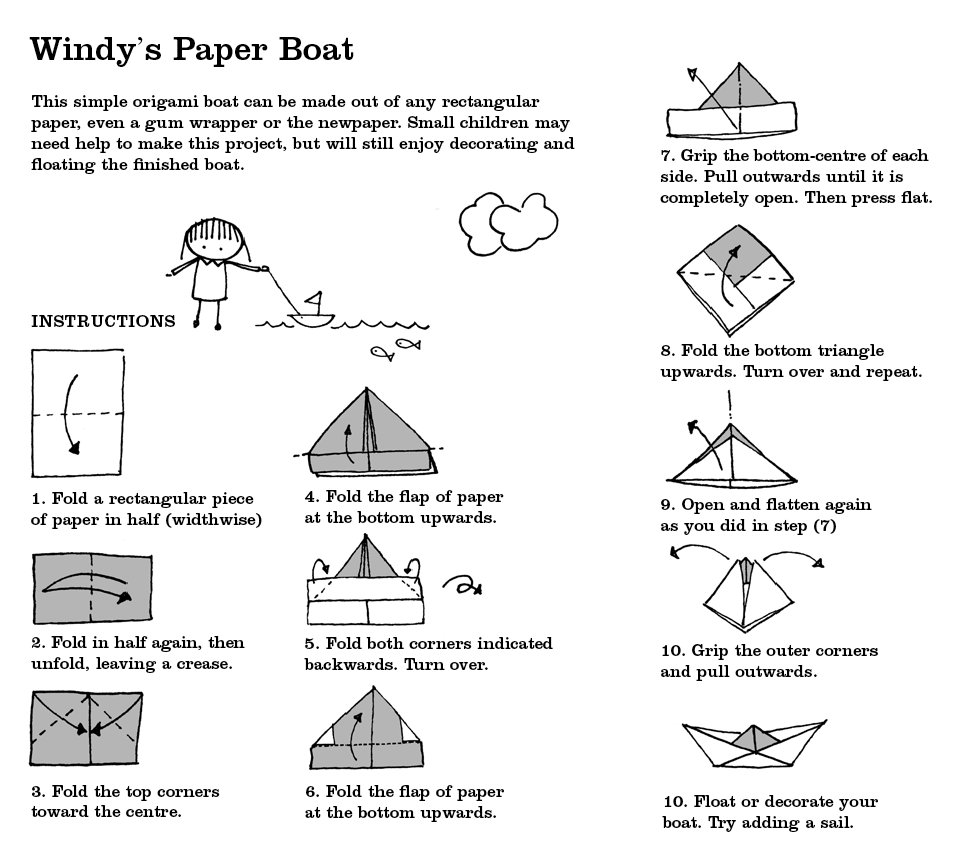
A paper boat for Windy, from the book Foggy.

Paper bag space helmet
Here is an activity inspired by the moon in our last post. This idea comes from the NASA web site.
Materials
Paper bag (big enough to fit over your head) tape scissors transparent plastic (office supplies or cellophane), preferably red decorating supplies (any kind you like)

1. Try on your bag and estimate where you should cut the hole for your eyes. Cut a rectangular hole in your bag, roughly 3 and 1/2 by 4 and 1/2 inches. (Cut the bottom off your bag if it's too long for your shoulders).

2. Cut a square of transparent plastic about 4 x 5 inches.

3. Tape the plastic over the hole. (If, like us, you attach it from the inside of the bag, you will have trouble folding the bag flat to draw on it, so gluing on decorations in the next step will work best).
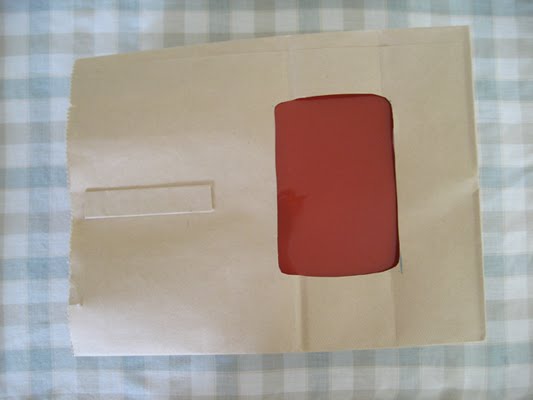
4. Decorate. You can experiment with different types of helmets. We tried one with an antennae and one with a microphone. Have fun on the moon.


How to make a mini kite
There are many ways to make a mini kite. If you would like to make a real kite, there are directions here.)
For a real kite the tail is attached to the bottom corner of the kite, separate from the main kite string, but this can get a little bulky on a mini kite. We often just have one main string and attach the bows to that.
Materials: The only special materials we sometime use are cloth covered wire, or florist's wire to make the string stay up in the air. Where you see "tape" or "glue" in the instructions, we often use little bits of double-sided tape as it is more forgiving. But regular tape and glue are ok, too. The kites on these pages use linen thread and wool for string.
Simple folded paper


This is the easiest way to make a kite. You just cut a diamond out of stiff paper (translucent coloured vellum paper works very, very well for this). Firmly fold in half lengthwise and crosswise, unfold. Glue or use a little piece of tape to attach a string or wire to the backside of the kite. Or you can pierce a little hole, pass your string through and knot it. You can also add some bows. Done!
Paper, sticks and glue
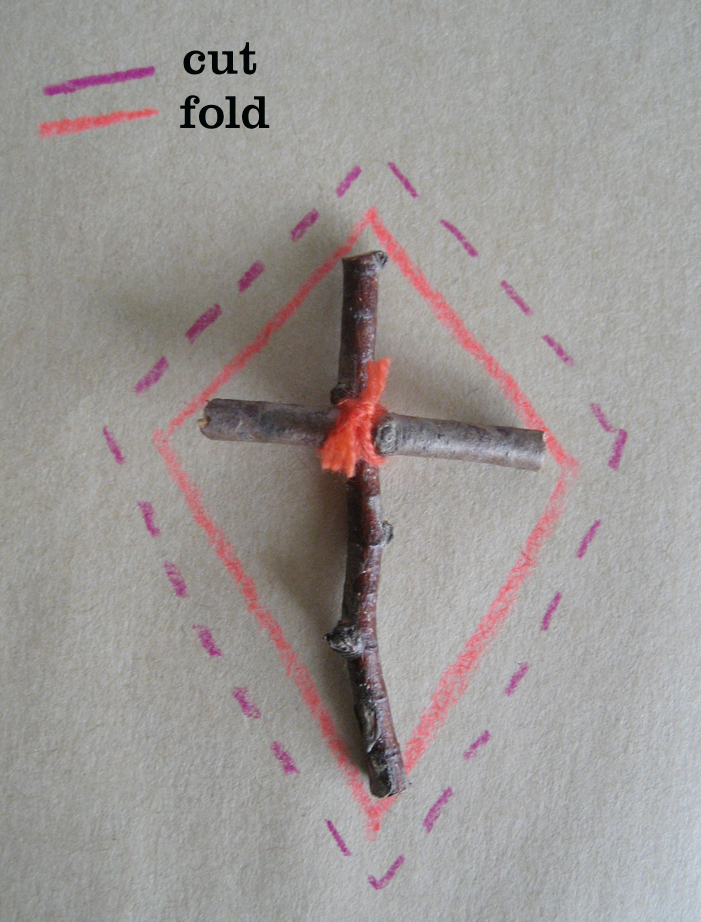


Take two small twigs, or sticks or toothpicks and place them crosswise, one on top of the other. Put a daub of glue or tape between them. Wrap some thread around the centre in a figure 8 pattern and knot, leaving one or two long tails. This will be the string and tail for your kite, so leave the ends quite long (this is a bit of a mistake in our photos: we cut them and had to add an extra string after). Knot or glue in place.
Next, place your frame on a piece of tissue or other light paper. Trace a diamond around your frame. Trace a bigger diamond around your first diamond. Cut out the bigger diamond. Fold along the lines of your smaller diamond. Place your frame in the middle of your diamond and if everything is lining up, put a dollop of glue or tape between the centre of your kite frame and the paper. Then glue and fold the edges of your diamond over the frame.
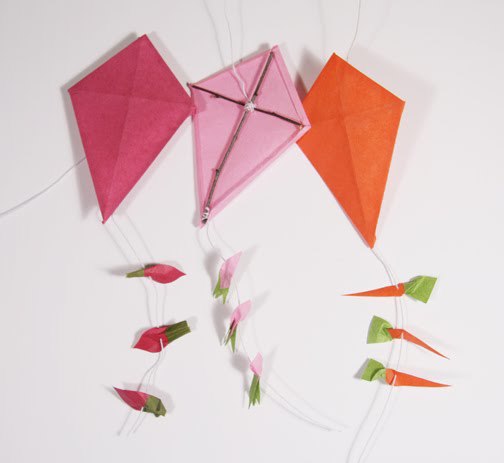
Cut your kite string and tail to the length you want. Decorate your tail with bows or whatever you like. We made vegetable bows for the bunnies' kites last year.
Paper or cloth with stitching
You can use a firmer paper or stiff cloth and stitch around the hem of the kite, using the directions above and the sewing around the hem by hand.
One last thing: you can make a little spool out of a little twig, empty spool of thread, or clothespin, and wind the end of the string onto it. This also acts as a holder.

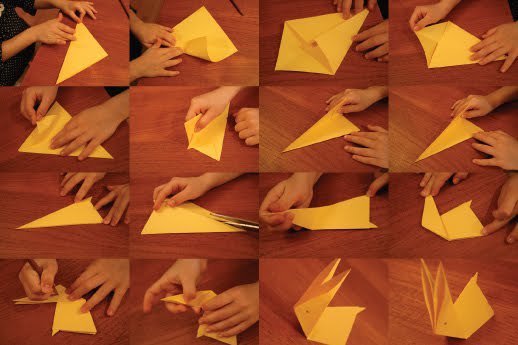
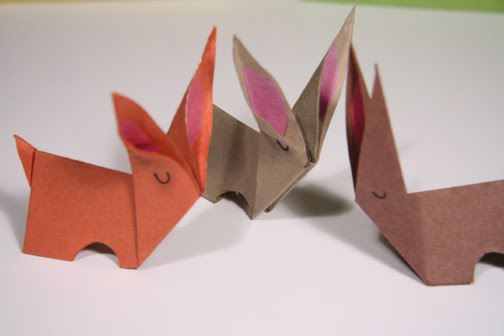
Easter Bunny origami
Do you remember the meadow bunnies in Windy? Here they are flying their kites.

You can make your own bunny with origami. You just need a square piece of paper, a pair of scissors and a pencil or crayon. You can check that your paper is perfectly square by folding it in half, the same as the first steps in our directions below (1 and 2) below. If there is no overlap, then your paper is square. Here are directions for folding up your bunny:

So it will look like this as you fold:
You can use some scraps of coloured paper to make the insides of the ears pink (or you might colour it in).
If you like, your bunny can have a kite, too (tutorial here). We used small sticks, glue and paper to make our bunny kites, but you could simply use plain folded paper. We used florist wire for the string, which is cloth-covered wire (so it holds the kite in the air). It is tricky for bunnies to hold their kites. Usually they use their mouths, front feet or tails. Use your imagination to make the perfect kite for an Easter bunny. We would love to see pictures of your bunnies. Mail your pictures to windyandfriends{at}gmail {dot}com.