

As there's less than a week before the start of Advent, we thought we'd quickly offer a classic project that your kids can enjoy all the way until Christmas. Here are our directions for an advent calendar made of matchboxes, including a PDF, if you'd like extra help.
Read More
Another Yarn Giveaway
We had such a positive response to our last yarn giveaway, that we thought we'd do another.
If you'd like to be updated about our next project or giveaway, you can subscribe to our blog by entering your email address on the upper-right corner of this page. We keep our mailing list private.
You could use the yarn from this giveaway for some finger knitting or even pair it with some of your own leftover chunky or worsted yarn for our Lonely Doll Scarf.
This time our yarn is a nice warm one: Berocco Vintage Chunky. This yarn will make you a muffler-length Windy Scarf, perfect for winter. We are not affiliated with Berocco, we chose the yarn because the colour is a nice deep red and the yarn is machine washable.
To win this yarn, please leave a comment below this post. Please be sure to leave an address so that we can contact you. Let us know in the commments below. Contest ends October 28. This is open to anyone worldwide and there is no fee to enter.

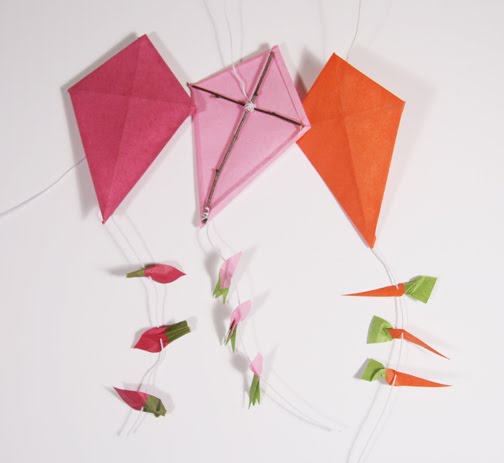
How to make a real kite, too
Oops — this post has moved, but you can find it by clicking here.
Have fun!

How to make a mini kite
There are many ways to make a mini kite. If you would like to make a real kite, there are directions here.)
For a real kite the tail is attached to the bottom corner of the kite, separate from the main kite string, but this can get a little bulky on a mini kite. We often just have one main string and attach the bows to that.
Materials: The only special materials we sometime use are cloth covered wire, or florist's wire to make the string stay up in the air. Where you see "tape" or "glue" in the instructions, we often use little bits of double-sided tape as it is more forgiving. But regular tape and glue are ok, too. The kites on these pages use linen thread and wool for string.
Simple folded paper


This is the easiest way to make a kite. You just cut a diamond out of stiff paper (translucent coloured vellum paper works very, very well for this). Firmly fold in half lengthwise and crosswise, unfold. Glue or use a little piece of tape to attach a string or wire to the backside of the kite. Or you can pierce a little hole, pass your string through and knot it. You can also add some bows. Done!
Paper, sticks and glue
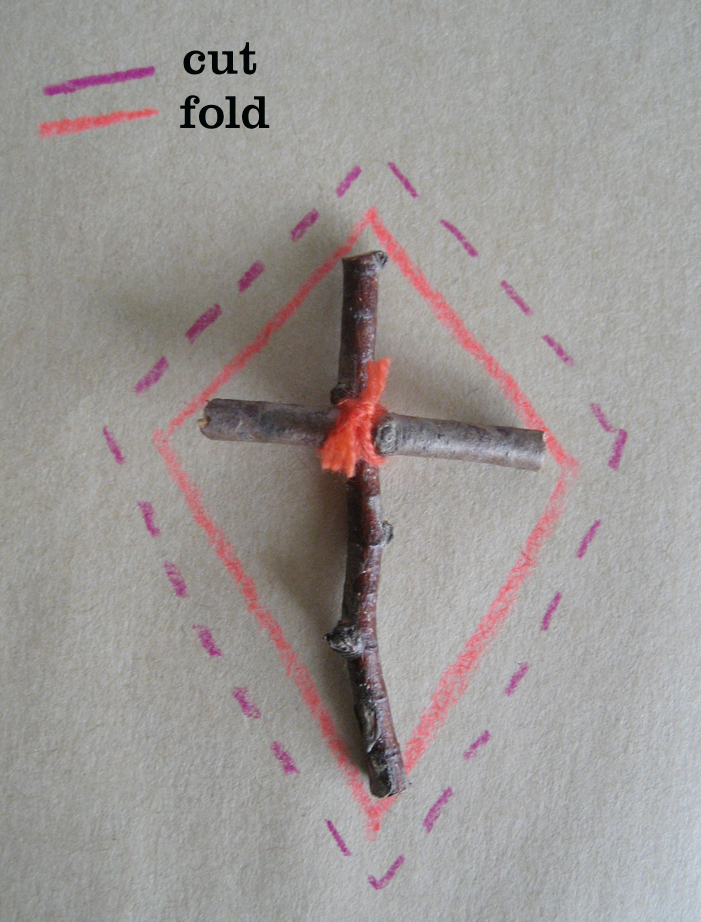


Take two small twigs, or sticks or toothpicks and place them crosswise, one on top of the other. Put a daub of glue or tape between them. Wrap some thread around the centre in a figure 8 pattern and knot, leaving one or two long tails. This will be the string and tail for your kite, so leave the ends quite long (this is a bit of a mistake in our photos: we cut them and had to add an extra string after). Knot or glue in place.
Next, place your frame on a piece of tissue or other light paper. Trace a diamond around your frame. Trace a bigger diamond around your first diamond. Cut out the bigger diamond. Fold along the lines of your smaller diamond. Place your frame in the middle of your diamond and if everything is lining up, put a dollop of glue or tape between the centre of your kite frame and the paper. Then glue and fold the edges of your diamond over the frame.
Cut your kite string and tail to the length you want. Decorate your tail with bows or whatever you like. We made vegetable bows for the bunnies' kites last year.
Paper or cloth with stitching
You can use a firmer paper or stiff cloth and stitch around the hem of the kite, using the directions above and the sewing around the hem by hand.
One last thing: you can make a little spool out of a little twig, empty spool of thread, or clothespin, and wind the end of the string onto it. This also acts as a holder.


Chirp outtakes (wheel painting)
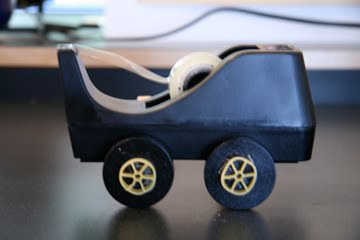
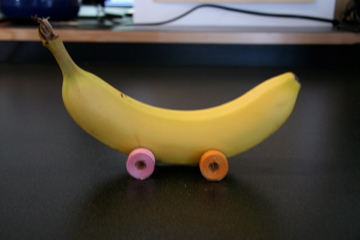
Last May we made a story about wheels for Chirp magazine. We tried all sorts of wheels and cars, but we only had room for a few of our vehicles in the story. Some of the tests we did were quite funny. Our favourite one is probably the cherry-tomato-tin-can car. The tape-dispenser-jalopy and the bananamobile are quite funny, too. What would you use to make wheels?
These are are some more of the vehicles from the cutting room floor.

